

Auto exposure controls the amount of light that is used to expose the camera’s image sensor. It does this by adjusting the aperture and the shutter speed.
Proper exposure is basically determined by averaging the amount of light needed to produce an image with good highlights, middle tones, and shadows.
The camera has a built in light meter that evaluates the total amount of light reflected from the subject. It then averages this light and sets the correct exposure.
Digital cameras can have more than one type of metering system however. So it is important to learn how your particular camera meter measures light as well as any options to change the way it does this.
Averaging Meter System
An averaging type of metering system is very common so we’ll look first at how it works and how to use it correctly.
With an averaging type system the meter reads the entire scene then calculates the exposure based on the assumption that there are a few highlights, a few shadows and a full range of mid-tones.
Very often this type of metering is center weighted, which means it gives more emphasis to the center or foreground area of the image than to the other areas. If your main subject is in this part of your photo, you should get a properly exposed image.

In the image to the left you see an example of an ‘average type scene’.
Shot against a gray background the subject has a good balance of light, middle, and dark areas.
With this type of balanced scene, auto exposure works well and the exposure comes out with good detail in both the shadow and highlight areas.

The same subject, this time with a bright white background
But if you have a large amount of bright area in the scene, such as snow or a bright sky, this method may not fare so well.
As this example shows, the large amount of white in the background caused the meter to calculate more total light, so the exposure was reduced.
Now the background is gray and the shadows lack detail. The overall effect is a muddy looking image.

A lot of black area will also cause the meter to render an incorrect exposure
The same subject but with a black background. This caused the meter to average less overall light and increase the exposure to compensate.
The result was an overexposed image which caused the white highlight areas to loose their detail.
Notice how washed out the tones are and the lack of detail in the whites. All 3 shots were done using auto exposure.
Assignment: Using Auto exposure
- Turn off your flash and make certain the averaging system of metering is selected. (This will likely be the default setting on your camera, so you won’t need to change anything).
- Choose a subject that has a good balance of light to dark areas in it and make your first shot.
It should be pretty well exposed, with good detail in the highlight and shadow areas. - Next, place your main subject in front of a very light background such as a bright sky or a well lit white wall and take the picture.
The subject will likely be too dark. The meter will reduce the exposure since it will average the total light in the scene. As a result mid-tones become dark, and shadows turn black. - Now place the same subject against a black background and the opposite will occur…the meter will allow more exposure and the subject will appear too light, and the lightest areas will become pure white, loosing their detail.
You can also demonstrate this averaging effect another way. Get a white, a grey and a black subject. The example below shows each item properly exposed.
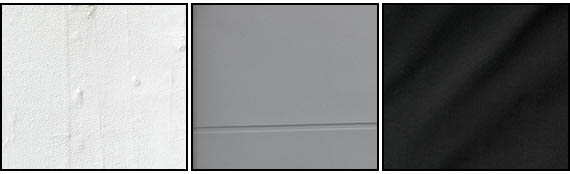
Now shoot each subject separately, filling the entire frame for each shot. The subjects will all become a similar grey tone, as shown in the shots below.
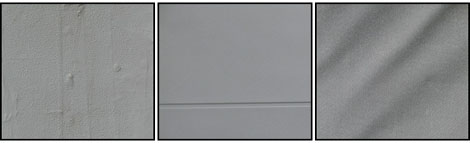
This is the way a camera sees things, and it is different than the way our eyes see. And by understanding this difference, you begin to see as the camera does and develop your eye and brain as a photographer. Learning to see as a photographer is an important step to improving your photos.
Using Exposure Lock
Ok…so how do we control this type of metering to get the results we want? Most digital cameras come with exposure lock. This allows you to lock the exposure by pressing the shutter release button halfway down and holding it there while you recompose your picture.
Experiment with this by placing a person in front of a bright background, such as a white wall or bright sky. Try turning the camera vertical, filling the majority of the frame with the subject. Lock in the exposure.
Now turn the camera to a horizontal composition with your subject off center and take the picture. Your subject should be well exposed.
TIP:
One caution here…often the focus and exposure are both locked when the shutter release button is pressed half way, so this technique is limited. As long as the subject is about the same distance from the lens in the final composition as it was when you used the lock function then you will be OK.
There are many additional controls for exposure and we’ll explore them all in the advanced features pages. If your camera doesn’t have these options, you will still want to know what they are…especially if you want more creative control over your photography. These options can be extremely important to getting the results you want.


0 comments